flowchart LR
HTML[**HTML**<br/>Structure & Content] --> WebPage((Rendered Webpage))
CSS[**CSS**<br/>Style & Layout] --> WebPage
JS[**JavaScript**<br/>Interactivity] --> WebPage
Package Managers, Libraries, and Frameworks
1. How to Use Quarto to Create a Basic Website
Quarto is an open-source publishing tool that lets you create websites, documents, and presentations from plain text (Markdown or Jupyter notebooks). We will use Quarto to create a simple static website.
Install Quarto
(You can skip this step if you have already installed Quarto on your computer.)
First, install Quarto on your computer:
macOS: Use Homebrew in the Terminal. For example:
brew install quartoThis command installs Quarto via Homebrew. You can verify the installation by running quarto –help afterwards.
Windows: Download the Quarto installer from Quarto Downloads.
To check if Quarto is installed, run the following command:
quarto --versionThis command should display the version number of Quarto.
Create a Simple Website using Quarto
Once Quarto is installed, let’s create a new website project. Quarto provides a convenient command to scaffold a website:
- Open your terminal (Terminal on Mac, or PowerShell on Windows). Navigate to the folder where you want to create your website project. For example, your Desktop or a projects folder:
cd ~/Desktop # navigate to Desktop (use cd %USERPROFILE%\Desktop on Windows)- Create a new Quarto website project. Run the following command:
quarto create project website mysiteThis tells Quarto to create a new project of type “website” named mysite (Creating a Website – Quarto). Quarto will create a new directory called mysite containing starter files for a website (such as index.qmd for the homepage, an about.qmd page, and a _quarto.yml configuration file).
Explore the project structure. After the command, go into the
mysitedirectory:cd mysiteYou should see files like
index.qmd,about.qmd, and_quarto.ymlin this folder.index.qmdis the homepage content (written in Quarto Markdown).about.qmdis an example secondary page._quarto.ymlis a configuration file for the site (it defines the site title, navigation menu, theme, etc.).
Generate and Preview the Site
Now that we have a Quarto project, we can generate (render) the website and preview it in a browser.
Render and preview the website. In the
mysitedirectory, run:quarto previewThis command renders the website and starts a local web server to preview it (Creating a Website – Quarto). After running this, you should see Quarto output indicating that it is serving the site (usually at http://localhost:quarto_port). A web browser may automatically open to show the site.
- The Quarto preview will watch for changes. If you edit the
.qmdfiles, the site will update automatically in the browser. Quarto uses a live-reload feature to refresh the page whenever you save changes.
- The Quarto preview will watch for changes. If you edit the
Navigate the site. In the browser, you should see the homepage (with some placeholder text like “Welcome to your Quarto website”). Click the “About” link in the navbar to see the About page. This confirms that multiple pages are set up and linked.
Stop the preview. In the terminal, you can press
Ctrl+Cto stop the Quarto preview server once you are done. Quarto has already generated the static files for the site in a_sitedirectory. If you want to do a full render without preview, you can runquarto renderto build the site into the_sitefolder (Creating a Website – Quarto).
Note: Quarto makes it easy to publish your site later (for example, via GitHub Pages or Netlify), but those steps are beyond this lesson. Here we focused on local creation and viewing.
2. Setting Up uv as a Virtual Environment for Python
In this section, we’ll set up a Python development environment. We will use uv (a modern Python package and environment manager) to manage a virtual environment. A virtual environment is an isolated environment that contains its own Python interpreter and packages, separate from your system-wide Python. This is useful to avoid conflicts between projects and to ensure reproducibility (Environments – Packaging). In other words, a virtual environment acts like a sandbox for each project’s Python libraries.
Why use a virtual environment?
Whenever you work on Python projects, it’s best practice to use a virtual environment to isolate the packages for that project (Environments – Packaging). This way, installing a new package for one project won’t break or affect other projects. It keeps your system Python clean and avoids version conflicts.
Install Python and uv
First, make sure you have Python installed (preferably Python 3.x) and then install uv. uv is a tool that streamlines Python setup, combining functionality of tools like pip (for packages) and venv (for environments) with higher speed (Using uv to install Python and create a virtual environment).
macOS: Install Python 3 and uv using Homebrew:
brew install python3
brew install uv
The first command ensures you have the latest Python (if you already have Python 3, you can skip it). The second installs uv via Homebrew (uv is available in Homebrew’s core packages (Installation | uv)). After installation, you can check versions by
python3 --versionanduv --version.Windows: Install Python and uv using winget:
winget install -e --id Python.Python.3.11
winget install -e --id astral-sh.uv
The first command installs Python 3.11 from the Microsoft Store or package feed (winget install Python). The second installs uv (the ID
astral-sh.uvcorresponds to uv’s package (Installation | uv)). If you already have Python installed, ensure it’s accessible viapythonorpython3in PowerShell. You can verify by runningpython --versionanduv --version.
What is uv?
uv is a new Python project manager written in Rust. It acts as a faster replacement for tools like pip and virtualenv. Using commands likeuv venv,uv pip, anduv pythoncan speed up Python installation and package management (Using uv to install Python and create a virtual environment). In fact, uv requires you to use a virtual environment by default for any package installations, encouraging best practices (Using environments | uv). We will use uv to create and manage our virtual environment.
Create and Activate a Virtual Environment
Now that Python and uv are set up, let’s create a virtual environment for our project. We will use uv to do this, but note that you could also use Python’s built-in venv module or other tools. We use uv here for convenience and speed.
Create a new project folder. It’s good to keep each project in its own directory. For example:
mkdir myproject && cd myprojectReplace “myproject” with a name of your choice for this lesson’s project.
Create a virtual environment using uv. In your project directory, run:
uv venvBy default, this will create a virtual environment in a folder named
.venvinside your project (Using environments | uv). If you prefer a different name, you could douv venv venvname, but we’ll stick with.venv. You should see uv output something like “Creating virtual environment at .venv…” and it may download a Python runtime if needed.What happened? The
.venvdirectory is created containing an isolated Python installation. All packages you install with uv (or pip) while this venv is active will go into this directory, not affecting the global Python.Activate the virtual environment. Activating the environment makes your shell use the project’s Python and packages.
On macOS/Linux, activate by running:
source .venv/bin/activateOn Windows (CMD or PowerShell), run:
.venv\Scripts\activate
After activation, your command prompt will usually change to show the name of the venv, for example:
(.venv) user@computer myproject $indicating that you are now “inside” the virtual environment. (If you ever want to deactivate, you can type
deactivate.)Using uv with the virtual environment: If you run
uvcommands in this directory, uv will automatically detect and use the.venvenvironment for package installations (Using environments | uv). For example, try:uv pip install requestsThis will install the Python package
requestsinside your virtual environment (using uv’s pip interface) (Using uv to install Python and create a virtual environment). If the environment is activated, you could also just runpip install requestsdirectly. Usinguv pipensures you’re targeting the correct environment without needing activation, but both approaches achieve the same result here.
Now our Python environment is ready to use. We have an isolated setup where we can install additional libraries needed for web scraping without affecting other projects or system Python.
3. The Three Main Components of a Website
Before we proceed to web scraping, it’s important to understand how websites are built. Websites are usually constructed with three core technologies: HTML, CSS, and JavaScript (What is JavaScript? - Learn web development | MDN). These are often referred to as the three layers of the web:
HTML (HyperText Markup Language) – defines the structure and content of the webpage. It is the foundation of the page, providing meaning and organization to text, images, links, etc. For example, HTML lets you specify headings, paragraphs, lists, links, and embed images. HTML is the markup language we use to structure and give meaning to our web content (e.g., defining paragraphs, headings, data tables, or embedding images) (What is JavaScript? - Learn web development | MDN).
CSS (Cascading Style Sheets) – controls the presentation and styling of the HTML content. CSS is used to set colors, fonts, layout, and overall visual design of the site. With CSS, you can make a page look attractive and follow a specific layout. In other words, CSS is a style sheet language used for specifying the presentation of a document written in HTML (CSS - Wikipedia). For example, you can use CSS to make all
<h1>headings blue or to layout your page in multiple columns. A simple CSS rule might look like:h1 { color: blue; text-align: center; }(This would turn all
<h1>headings blue and center them.)JavaScript – adds interactivity and dynamic behavior to web pages. JavaScript is a programming language that runs in the browser. It can respond to user actions (like clicks or key presses), modify HTML/CSS on the fly, fetch data from servers without reloading the page (AJAX), and much more. Essentially, JavaScript enables you to create dynamically updating content and interactive features on a webpage (What is JavaScript? - Learn web development | MDN). For example, a JavaScript snippet can show an alert when a button is clicked, or build a photo gallery that changes images when you press “Next.”
These three components work together in every modern website. A useful analogy is to think of a webpage like a document: HTML is the content and structure (the words on the page), CSS is the formatting (how the text and images look), and JavaScript is like an assistant that can change the content or formatting in response to actions (making the page interactive).
We can visualize the relationship between HTML, CSS, and JavaScript as follows:
In the diagram, the Rendered Webpage (what the user sees) is the result of the browser taking HTML, applying CSS to style it, and executing JavaScript to add interactive behavior. Each component is essential: without HTML, there’s nothing to display; without CSS, the content will lack visual appeal; without JavaScript, the page cannot dynamically respond to user input beyond basic links or form submissions.
How the Browser Uses These Components: When you load a webpage, the browser first downloads the HTML file. As it reads the HTML, it might find references to CSS files and JavaScript files. It then fetches the CSS to apply styles, and runs the JavaScript code. This process often happens very quickly: - The HTML provides the page structure (elements like headings, paragraphs, images, etc.). - The browser applies CSS rules to those HTML elements to make the page look as intended (layout, colors, fonts). - Finally, any JavaScript is executed, which can manipulate the HTML/CSS or handle user events (like clicking a menu to drop down more options).
Understanding these components is crucial for web scraping, because when you scrape a website, you are usually retrieving the HTML content. The data you want is embedded in the HTML. Sometimes the data might be added or modified by JavaScript after the page loads (which can complicate scraping), but basic scraping approaches work with the HTML that the server initially sends. We’ll discuss these details next.
4. How to Scrape Data from a Website
Web scraping is an automated method of extracting information from websites. In practical terms, it means writing a program (or using a tool) that downloads web pages and pulls out the specific data you care about. Instead of copying and pasting by hand, a scraper can quickly gather large amounts of data.
Basic Web Scraping Principles
Let’s break down the typical process of web scraping:
Identify the target site and data: Choose the website (and specific pages) that have the data you need. This could be a single page or multiple pages (for example, all pages of an online catalog).
Fetch the webpage content: Your scraping program sends an HTTP GET request to the web server for the target URL, just like a browser would. The server responds with the content of the page (usually HTML). Most of the retrieved information from web scraping is unstructured HTML data, which we then need to parse and convert into structured data (The Etiquette of Web Scraping and How to Use Web Scraping Legally).
Parse the HTML: The raw HTML is a bunch of text with tags. The scraper needs to parse this HTML to find the pieces of data you want. This often involves looking for specific HTML elements or patterns (for example, finding all
<div>tags with a certain class name, which might contain the info of interest). Tools like Python’s Beautiful Soup or lxml can help traverse and search the HTML DOM (Document Object Model).Extract the data: Once the program locates the relevant part of the HTML, it extracts the text (or links, or images, etc.) from that segment. For example, if you’re scraping a dictionary website, you might extract the pronunciation or definition text within a specific tag.
Store the data in a structured format: After extraction, the data can be stored in a usable format such as a CSV file, JSON file, or a database. This makes it easier to analyze or reuse the data later. Often, scraped data is saved into a spreadsheet or database after parsing the HTML into structured form (The Etiquette of Web Scraping and How to Use Web Scraping Legally).
In a simple flow, it looks like this: 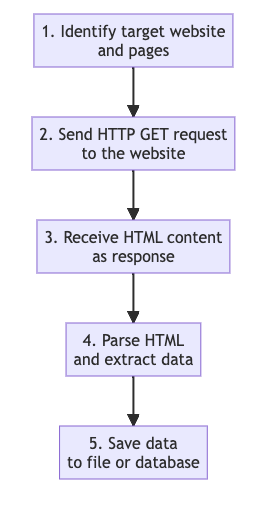
Each of these steps can be implemented with various tools. For example, in Python, you might use the requests library for step 2 (to fetch pages) and BeautifulSoup for step 4 (to parse HTML). In this lesson, we will use a high-level tool (crawl4ai) that combines these steps for us.
Important: Not all websites are easily scrapable with just requests and HTML parsing. Some websites load data via JavaScript after the initial page load (for example, infinite scrolling or interactive maps). In those cases, basic scrapers might only get an initial HTML without the data. Advanced methods like using a headless browser (Selenium or Playwright) or specific scraping tools are needed. The tool we’ll use, crawl4ai, can handle many dynamic cases under the hood.
Ethical Considerations
Web scraping is a powerful technique, but it should be done responsibly and legally. Here are some key ethical guidelines and considerations to keep in mind:
Check the Terms of Service and robots.txt: Many websites state in their terms of service whether automated scraping is allowed or not. Some sites also provide a
robots.txtfile that indicates which parts of the site can be accessed by robots (scrapers). Always check these; if a site explicitly forbids scraping, respect that. If a website’s terms and conditions prohibit scraping its content, doing so could get you in legal trouble (Legal and Ethical Considerations - Python Web Scraping). When in doubt, you might consider asking the website owner for permission if the data is critical for your research.Do not overwhelm the server (Be gentle): Scrape at a reasonable pace. Sending hundreds of requests per second can harm the website’s performance and might get your IP address banned. It’s good etiquette to space out your requests (e.g., by adding small delays between fetches) and only request what you need. Making too many rapid requests can make your scraper appear like a denial-of-service attack and result in being blocked (Legal and Ethical Considerations - Python Web Scraping). Treat the website kindly, as if you were a human browsing (a good rule is to not fetch pages faster than a human could manually).
Respect content ownership and copyrights: Just because data is publicly visible on a website does not always mean you are free to reuse it however you want. If you plan to publish or share the scraped data, ensure you are not violating copyright or privacy laws. For example, scraping personal information or copyrighted text in bulk could be illegal. Web scraping is generally tolerated if you don’t disrupt the site, but reusing the data without permission may breach copyright law (Legal and Ethical Considerations - Python Web Scraping). Always cite or give credit if appropriate, and don’t republish others’ content wholesale unless it’s clearly permitted.
Use public APIs if available: Some websites offer official APIs for data access. It’s often better to use an API than to scrape HTML, because APIs are meant for data consumption and usually come with documentation and legal usage guidelines. For example, instead of scraping a site like Twitter or Wikipedia, you might use their API, which gives structured data directly. (However, not all sites have APIs, which is why scraping is sometimes necessary.)
Test your scraper and handle errors: Ethical scraping also means being a good citizen by handling error responses. If the site starts returning errors (like HTTP 429 Too Many Requests), back off—your scraper might be hitting limits. Also, identify yourself in the User-Agent header if possible (some scrapers set a custom user agent string). This transparency can help site admins understand your intentions (some even ask you to contact them if you plan heavy scraping).
Remember, the goal is to gather data without negatively impacting the website or violating any rules. When done responsibly, web scraping is a powerful tool for researchers—many consider it similar to what a person with a browser does, just automated. In fact, accessing data via a scraper is like a browser visiting pages, but the law can view automated scraping differently from manual browsing (Legal and Ethical Considerations - Python Web Scraping), so it’s best to err on the side of caution.
5. Using crawl4ai to Scrape Data from a Website
Now we will put everything together and perform a practical web scraping example using crawl4ai. crawl4ai is an open-source web crawling and scraping framework that makes it easier to fetch and extract content, even from complex websites. It has gained popularity for being fast and “AI-ready” (it can output content in formats suitable for language models or data analysis) (Home - Crawl4AI Documentation (v0.4.3bx)). We will use crawl4ai to scrape data from zdic.net, which is a Chinese dictionary website.
Introduction to crawl4ai
What is crawl4ai? In simple terms, crawl4ai is a Python library (and tool) that automates web data collection. It can crawl web pages and scrape content efficiently. Some key points about crawl4ai:
- Easy content extraction: By default, crawl4ai can extract the main content of pages and even convert it into Markdown format for easy reading or processing (Home - Crawl4AI Documentation (v0.4.3bx)).
- Handles dynamic pages: It has the ability to run JavaScript on pages (using headless browsing under the hood) when needed, which means it can scrape content that only appears after scripts run.
- Asynchronous and fast: crawl4ai is built with performance in mind (using asynchronous programming and a Rust core). This means it can scrape multiple pages concurrently and faster than many traditional Python scrapers.
- Designed for AI/data pipelines: The tool was developed to feed data to AI models, which means it focuses on getting clean text out of web pages (e.g., ready for use in language model training or data analysis).
In our use case, we won’t dive into advanced features. We’ll simply use it to fetch a page and extract its content.
Installation: We will install crawl4ai in our Python environment (the one we set up in Section 2). Ensure your virtual environment is activated in your project folder (you should see (.venv) in your terminal prompt). Then install crawl4ai via pip:
uv pip install crawl4aiUsing uv pip ensures the package installs into our .venv. (If you activated the environment, you could alternatively do pip install crawl4ai.)
This will download and install crawl4ai and its dependencies. Once completed, we can use it in our Python code.
Step-by-Step: Scraping zdic.net with crawl4ai
We will now write a short Python script to scrape content from https://www.zdic.net and save the data. For demonstration, we’ll scrape the homepage of zdic.net (and you could adapt the code to scrape other pages or multiple pages).
Create a Python script file: Using a text editor or an IDE, create a new file in your project folder named
scrape_zdic.py. This is where our scraping code will go.Write the scraping code: Copy the following code into
scrape_zdic.py:import asyncio from crawl4ai import AsyncWebCrawler async def main(): # Create an asynchronous web crawler instance async with AsyncWebCrawler() as crawler: # Run the crawler on the target URL result = await crawler.arun(url="https://www.zdic.net") # Extract the page content in Markdown format content = result.markdown # crawl4ai returns the content as Markdown text # Save the scraped content to a file with open("zdic_content.md", "w", encoding="utf-8") as f: f.write(content) # (Optional) Also print a short preview of the content print(content[:500]) # print first 500 characters # Execute the async function using asyncio asyncio.run(main())Let’s break down what this code does:
- It imports
asyncioandAsyncWebCrawlerfrom crawl4ai.AsyncWebCrawleris the main class provided by crawl4ai to perform asynchronous web crawling. - We define an async function
main()where the scraping logic resides. async with AsyncWebCrawler() as crawler:initializes the crawler in a context manager. This sets up resources (like a headless browser session if needed) and ensures they are cleaned up after use.result = await crawler.arun(url="https://www.zdic.net")instructs the crawler to fetch the page at the given URL. Theawaitkeyword is because this is an asynchronous operation.arunreturns a result object which includes the content.- We access
result.markdownwhich is the page content converted to Markdown text by crawl4ai. (crawl4ai also providesresult.textfor plain text andresult.htmlif you need the raw HTML, among other things. Here, Markdown is convenient for readability.) - We open a new file
zdic_content.mdin write mode with UTF-8 encoding, and write the content into it. This will save the scraped page content to a file on disk. - We print the first 500 characters of the content to the console, just to give a quick confirmation output. This is optional, but it lets us see something immediately when we run the script.
- Finally,
asyncio.run(main())runs our asynchronousmain()function. This is needed because we definedmain()withasync def. It sets up an event loop, runs the coroutine, and then closes the loop.
- It imports
Run the scraper script: Save the file and go back to your terminal (make sure you’re in the project directory and the virtual environment is active). Run the script with Python:
uv python scrape_zdic.pyWe use
uv pythonto ensure it uses the Python from our.venv. (If you have the venv activated, you could just dopython scrape_zdic.py.)When you run this, crawl4ai will fetch the zdic.net homepage. The first time, it might take a few seconds because it may need to start a headless browser in the background for rendering (if the site requires it). You should see the printed preview text in the terminal – likely a bunch of Markdown text that includes some content from zdic’s homepage. For example, you might see some Chinese text, titles, or menu items in the output preview.
Verify the output: After the script finishes, check your project directory for the file
zdic_content.md. Open this file with a text editor. You should see the content of zdic.net’s homepage in Markdown format. It will contain text and links that were on the page. In Markdown, for example, hyperlinks are in the form[link text](url)and headings might be prefixed with#symbols.If the content looks a bit cluttered (lots of links or menu items), that’s normal for a raw scrape of a homepage. In a real scenario, you might target a more specific page (for example, a page for a particular Chinese character’s definition) to get more focused data. You could also refine the extraction using crawl4ai’s features (like selecting only part of the page), but that’s beyond our current scope.
Next steps (optional): If you were doing a larger project, you could extend this script to:
- Scrape multiple pages: e.g., loop through a list of URLs (like multiple dictionary entries) and scrape each one, appending or saving separately.
- Parse the Markdown or HTML to extract specific pieces: e.g., get just the definition text or pronunciation from each page. You might use additional parsing on
result.htmlor use crawl4ai’s extraction strategies. - Rate-limit your requests if scraping many pages: add
await asyncio.sleep(1)between fetches or use crawl4ai’s concurrency controls to avoid hitting the server too fast.
For our lesson, we have successfully scraped one website page using a modern tool. The key takeaway is that crawl4ai simplified the process for us: we didn’t have to manually handle requests, responses, or HTML parsing. It retrieved the page and gave us the content in a usable form.
Conclusion
In this lesson, we’ve covered a lot of ground in 2 hours and 45 minutes:
Using Quarto to create a basic website: You installed Quarto, generated a website project, and previewed it. This introduced you to the idea of writing content in Markdown (
.qmdfiles) and publishing it as a website.Setting up a Python virtual environment with uv: You learned what virtual environments are and why they’re useful. We installed Python and uv, and created an isolated environment for our project. This ensures that any Python libraries we use (like crawl4ai) do not interfere with other projects or system libraries.
Understanding HTML, CSS, and JavaScript: We reviewed the three main components of web pages. Knowing the role of each helps you understand what you’re looking at when inspecting a webpage’s source, and what data you might get when scraping.
Web scraping basics and ethics: We discussed how web scraping works at a high level and emphasized doing it responsibly. Always keep ethics in mind—scrape gently and respect the rules.
Practical web scraping with crawl4ai: We installed crawl4ai and used it to scrape data from a real website (zdic.net). The example code provides a template you can adapt to other sites and needs. You saw how to fetch a page and save its content, all in a few lines of Python thanks to the crawl4ai library.